이전 글(구글 클라우드 플랫폼(GCP)에 OpenVPN 서버 구축(1) : 용어 파악)에 이어서 쓰는 글입니다.
이전 글에서 우분투에 OpenVPN 커뮤니티판(오픈소스 버전)을 설치해야 될 것 같으며, 직접 컴파일하여 설치하는 방법으로 진행할 것 같다고 언급했습니다.
솔직히, 최대한 쉽게 가려면 apt 명령어로 openvpn을 설치하고 설정 파일을 만져서 구축하면 됩니다. 영어로 검색해보면 훌륭한 튜토리얼들이 이미 나와 있기도 해요.
(https://www.digitalocean.com/community/tutorials/how-to-set-up-and-configure-an-openvpn-server-on-ubuntu-20-04) => digitalocean은 보물창고.ㅎ
하지만 OpenVPN은 취약점 공유가 적극적으로 되고 있는 편이라, 우분투 LTS처럼 2년마다 판올림하면서 그때마다 서드파티 패키지들의 버전을 챙기는 흐름에 맡기기에는 다소 불안합니다. 적어도 VPN이나 SAMBA 정도는 가능한 최신 버전&최신 보안패치를 유지하는 것이 낫다고 봐요.
▼ 우분투 패키지 버전 확인 방법을 이용해서 openvpn 패키지를 살펴보면 2.4.7로 나와 있는데요,

▼ OpenVPN Community판 다운로드 페이지에서 2.4.7 버전의 출시일을 보면 2019년 2월로 나와 있습니다.

소프트웨어 업계에서 2년이면 무시할 수 없는 기간이라고 봅니다. 그래서 저는 OpenVPN 2.5.1 버전의 소스코드를 받은 다음 우분투 20.04 LTS에서 컴파일 설치하여 구축할 겁니다.
▼ 하지만 방법을 모르니, 염탐을 해봤습니다. OpenVPN 2.5.1 소스코드를 받고 압축을 해제한 뒤 readme 파일을 열어서 Install하는 방법을 살펴봤습니다. 첫번째 별표(*)줄로 묶인 부분이 핵심이네요.
OpenVPN -- A Secure tunneling daemon

Copyright (C) 2002-2018 OpenVPN Inc. This program is free software;
you can redistribute it and/or modify
it under the terms of the GNU General Public License version 2
as published by the Free Software Foundation.

*************************************************************************

To get the latest release of OpenVPN, go to:

	https://openvpn.net/index.php/download/community-downloads.html

To Build and Install,

	tar -zxf openvpn-<version>.tar.gz
	cd openvpn-<version>
	./configure
	make
	make install

or see the file INSTALL for more info.

*************************************************************************

For detailed information on OpenVPN, including examples, see the man page
  http://openvpn.net/man.html

For a sample VPN configuration, see
  http://openvpn.net/howto.html

To report an issue, see
  https://community.openvpn.net/openvpn/report

For a description of OpenVPN's underlying protocol,
  see the file ssl.h included in the source distribution.

*************************************************************************

Other Files & Directories:

* configure.ac -- script to rebuild our configure
  script and makefile.

* sample/sample-scripts/verify-cn

  A sample perl script which can be used with OpenVPN's
  --tls-verify option to provide a customized authentication
  test on embedded X509 certificate fields.

* sample/sample-keys/

  Sample RSA keys and certificates.  DON'T USE THESE FILES
  FOR ANYTHING OTHER THAN TESTING BECAUSE THEY ARE TOTALLY INSECURE.

* sample/sample-config-files/

  A collection of OpenVPN config files and scripts from
  the HOWTO at http://openvpn.net/howto.html

*************************************************************************

Note that easy-rsa and tap-windows are now maintained in their own subprojects.
Their source code is available here:

  https://github.com/OpenVPN/easy-rsa
  https://github.com/OpenVPN/tap-windows

The old cross-compilation environment (domake-win) and the Python-based
buildsystem have been replaced with openvpn-build:

  https://github.com/OpenVPN/openvpn-build

See the INSTALL file for usage information.
그리고 컴파일 설치 방법을 검색해 봤더니, 소스파일을 지우지 말아야 언인스톨을 할 수 있다고 하네요.
그렇다면 소스파일을 체계적으로 관리해둘 공간이 있어야 되겠죠?
아래 링크에 단서가 있었습니다.
https://webdir.tistory.com/101
https://unix.stackexchange.com/questions/10814/what-is-the-usr-local-src-folder-meant-for
그러니까 /usr/src 디렉토리는 시스템 구성요소의 소스를 보관하는 장소이고(예: 커널소스), 건들지 말아야 할 공간.
/usr/local/src 폴더는 응용프로그램의 소스를 보관하는 장소이고, 여기에 OpenVPN 소스를 보관하면 되겠군요.
▼ 터미널 창에서 리눅스 디렉토리(폴더) 찾는 명령어로 src 폴더를 찾아봤는데 /usr/src, /usr/local/src가 있었습니다.

▼ GUI 기반의 검색 프로그램(예 : KFind)을 써도 출력되는 결과는 같습니다.

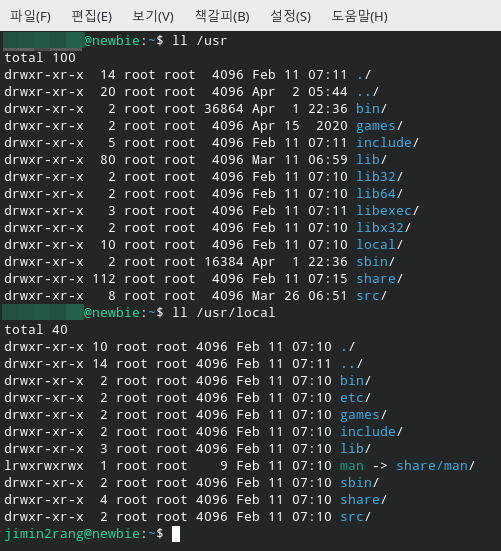
▼ /usr/src/ 경로, /usr/local/src/ 경로에 일반 계정으로 파일을 저장/복사/이동할 수 있는지 확인하기 위해 ll 명령어로 권한을 확인해 봤습니다. root 권한으로 되어 있어서 sudo 명령어를 써야만 하겠습니다.
▼ https://openvpn.net/community-downloads 경로로 들어가서, OpenVPN 커뮤니티판 최신버전인 2.5.1의 tar.gz 다운로드 링크를 마우스 우클릭하여 주소를 복사합니다.

▼ cd 명령어로 /usr/local/src 경로로 접근한 다음,
복사했던 주소를 sudo wget 명령어 뒤에 붙여서 openvpn-2.5.1.tar.gz 파일을 받습니다.
(주소 붙여넣기는 Ctrl+Shift+V 단축키를 이용하면 쉽습니다.)
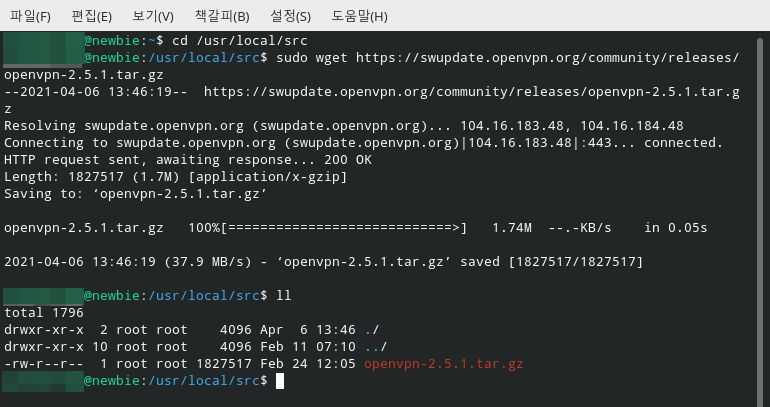
▲ cd /usr/local/src
sudo wget https://swupdate.openvpn.org/community/releases/openvpn-버전명.tar.gz
이후 과정은 다음 글에서 적겠습니다.
급하신 분은 디렉토리 내의 README 파일에 적혀 있듯이, INSTALL 파일의 내용을 참고하세요.
(To Build and Install, 블라블라~ or see the file INSTALL for more info.)
'도움이 되는 Tip > 리눅스&워드프레스' 카테고리의 다른 글
| 구글 클라우드 플랫폼(GCP)에 OpenVPN 서버 구축(3) : 소스 컴파일 설치 (1) | 2021.04.07 |
|---|---|
| 구글 클라우드 플랫폼(GCP)에 OpenVPN 서버 구축(1) : 용어 파악 (0) | 2021.04.04 |
| 구글 클라우드 플랫폼(GCP)에 OpenVPN 서버 구축(0) : 무료 VPN 사전 준비 (0) | 2021.04.02 |